The battle showcased the courage and tenacity of the United States Navy's Task Unit 77.4.3, commonly known as "Taffy 3," as they faced an overwhelming Japanese force. Despite being vastly outgunned and outnumbered, the American sailors fought with extraordinary valor, forcing the Japanese fleet to retreat and altering the course of the war. The Battle of Samar was not just a confrontation of ships and firepower but a testament to the human spirit. The sailors aboard the small escort carriers, destroyers, and destroyer escorts of Taffy 3 displayed remarkable ingenuity and bravery. They relied on clever tactics, such as smoke screens and deceptive maneuvers, to confuse and deter the enemy. Their actions not only saved their own lives but also ensured the success of the larger Allied invasion of the Philippines. This battle demonstrated how sheer determination and teamwork could triumph over superior force, leaving an indelible mark on military strategy and leadership. As we delve deeper into the Battle of Samar, we uncover not just the events of that fateful day but also the lessons it imparts about courage, leadership, and the unpredictable nature of warfare. From the personal stories of the sailors to the strategic decisions made by commanders, this battle serves as a powerful reminder of the sacrifices made during wartime. By exploring its nuances, we gain a greater appreciation for the complexities of naval combat and the enduring legacy of those who fought in one of history's most pivotal conflicts.
Table of Contents
- What Were the Causes Leading to the Battle of Samar?
- How Did Taffy 3 Turn the Tide at the Battle of Samar?
- Who Were the Key Figures in the Battle of Samar?
- What Were the Tactics and Strategies Used in the Battle of Samar?
- What Were the Aftermath and Consequences of the Battle of Samar?
- How Does the Battle of Samar Compare to Other Naval Battles?
- What Lessons Can We Learn from the Battle of Samar?
- Frequently Asked Questions About the Battle of Samar
What Were the Causes Leading to the Battle of Samar?
The Battle of Samar was the culmination of a series of strategic decisions and military operations that unfolded during World War II. The larger context of the battle lies within the Battle of Leyte Gulf, a massive Allied campaign aimed at recapturing the Philippines from Japanese control. The Philippines, a key strategic location in the Pacific, was vital for both the Allies and the Japanese. For the Allies, it represented a stepping stone toward the Japanese mainland, while for Japan, losing the Philippines would mean the severing of vital supply lines and a significant blow to their war effort.
The Japanese, aware of the impending Allied invasion, devised a complex plan known as "Operation Sho-Go." This plan involved splitting their naval forces into three main groups to attack the Allied forces from multiple directions. The goal was to lure the U.S. Third Fleet, commanded by Admiral William Halsey, away from the landing beaches at Leyte Gulf, leaving the Allied invasion force vulnerable to attack. The Japanese Center Force, commanded by Admiral Takeo Kurita, was tasked with breaking through the San Bernardino Strait and attacking the Allied landing forces. However, Kurita's force encountered unexpected resistance from Taffy 3, a small and lightly armed task unit, leading to the Battle of Samar.
Read also:Long Wongs The Ultimate Guide To An Iconic Name
The causes of the battle can also be traced to intelligence failures and miscommunication. Admiral Halsey, believing the Japanese decoy force in the north posed the greatest threat, took the Third Fleet northward to engage them. This left the San Bernardino Strait unguarded, allowing Kurita's force to enter the area undetected. Meanwhile, the sailors of Taffy 3, unaware of the full extent of the danger they faced, were caught off guard when the Japanese fleet appeared on the horizon. These factors set the stage for one of the most dramatic naval engagements of the war, where courage and quick thinking would play a decisive role.
How Did Taffy 3 Turn the Tide at the Battle of Samar?
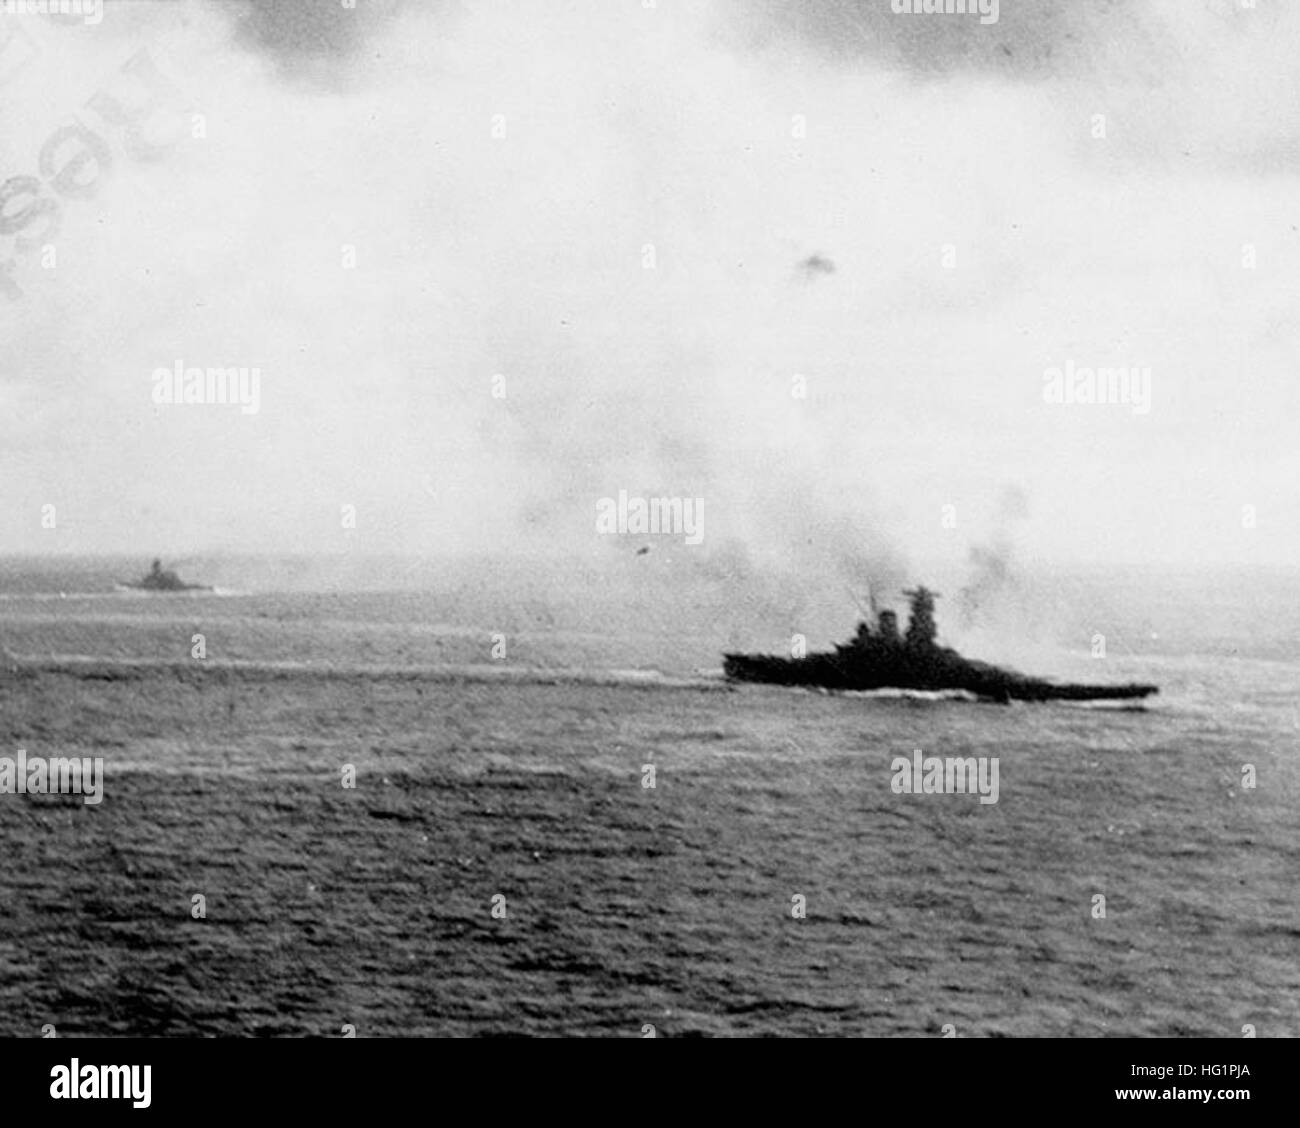
When Admiral Kurita's powerful fleet emerged from the San Bernardino Strait, the sailors of Taffy 3 faced an overwhelming adversary. The Japanese force consisted of battleships, heavy cruisers, and destroyers, far surpassing the capabilities of Taffy 3's escort carriers, destroyers, and destroyer escorts. Despite the odds, the American sailors executed a series of bold and innovative maneuvers that would ultimately save the day. Their actions not only demonstrated extraordinary bravery but also showcased the importance of adaptability and teamwork in the heat of battle.
One of the most critical strategies employed by Taffy 3 was the use of smoke screens. The escort carriers, such as the USS *Gambier Bay* and USS *St. Lo*, launched aircraft to drop smoke bombs and create thick clouds that obscured the Japanese fleet's line of sight. This tactic, combined with the natural haze of the morning, made it difficult for the Japanese ships to accurately target the smaller American vessels. The smoke screens allowed Taffy 3 to maneuver more effectively and buy precious time for reinforcements to arrive. Additionally, the destroyers and destroyer escorts, such as the USS *Johnston* and USS *Hoel*, conducted aggressive torpedo attacks against the Japanese fleet, drawing their fire and further complicating their advance.
Communication and coordination were also key to Taffy 3's success. Despite the chaos of the battle, the sailors maintained clear lines of communication, ensuring that each ship knew its role and position. The USS *Samuel B. Roberts*, a destroyer escort, famously charged headlong into the Japanese fleet, engaging enemy cruisers and battleships despite being heavily outgunned. This selfless act inspired the rest of the task unit and forced the Japanese to divert their attention. Ultimately, Admiral Kurita, believing he was facing a much larger force and fearing the arrival of American reinforcements, made the fateful decision to withdraw. The sailors of Taffy 3 had achieved the improbable, turning the tide of the battle and securing a crucial victory for the Allies.
Who Were the Key Figures in the Battle of Samar?
The Battle of Samar was defined not only by the collective bravery of Taffy 3 but also by the leadership and actions of key individuals who played pivotal roles in the conflict. Among these figures, Admiral Clifton Sprague, Commander Ernest Evans, and Commander Robert Copeland stand out for their exceptional courage and strategic acumen. Their decisions and sacrifices were instrumental in the success of the American forces during this critical engagement.
Admiral Clifton Sprague
Admiral Clifton Sprague, the commander of Taffy 3, was the linchpin of the American defense. When the Japanese fleet appeared on the horizon, Sprague quickly assessed the situation and issued orders that maximized the task unit's limited resources. His calm demeanor and decisive leadership under pressure inspired confidence among his crew. Sprague's decision to deploy smoke screens and coordinate aggressive attacks by his destroyers and destroyer escorts proved to be a masterstroke. His ability to adapt to the rapidly evolving battle conditions ensured that Taffy 3 could hold its ground long enough for the Japanese to retreat.
Read also:How Many Megan Thee Stallion Songs Crossword A Comprehensive Guide
Commander Ernest Evans
Commander Ernest Evans of the USS *Johnston* exemplified the spirit of sacrifice and determination. Despite commanding a small destroyer, Evans led his ship into a daring charge against the Japanese fleet, launching torpedoes and drawing enemy fire away from the vulnerable escort carriers. His actions inflicted significant damage on the Japanese heavy cruiser *Kumano* and disrupted the enemy's formation. Evans's bravery earned him a posthumous Medal of Honor, as he went down with his ship during the battle. His leadership and selflessness became a rallying point for the entire task unit.
Commander Robert Copeland
Commander Robert Copeland of the USS *Samuel B. Roberts* demonstrated extraordinary valor by leading his destroyer escort into the heart of the Japanese fleet. Despite being heavily outgunned, Copeland's ship engaged enemy cruisers and battleships, inflicting damage and forcing the Japanese to divert their attention. Copeland's unwavering resolve and tactical ingenuity inspired his crew and contributed to the confusion among the Japanese forces. His actions underscored the importance of leadership and determination in the face of overwhelming odds.
| Name | Rank/Position | Role in the Battle | Notable Achievements |
|---|---|---|---|
| Admiral Clifton Sprague | Commander of Taffy 3 | Directed overall strategy and coordination | Successfully led defense against Japanese fleet |
| Commander Ernest Evans | Commander of USS *Johnston* | Led aggressive torpedo attacks | Posthumous Medal of Honor recipient |
| Commander Robert Copeland | Commander of USS *Samuel B. Roberts* | Engaged enemy cruisers and battleships | Inflicted damage and inspired crew |
What Were the Tactics and Strategies Used in the Battle of Samar?
The Battle of Samar is a testament to the ingenuity and resourcefulness of the sailors of Taffy 3, who employed a range of tactics and strategies to counter the overwhelming Japanese force. These tactics were not only crucial to their survival but also instrumental in turning the tide of the battle. Among the most effective strategies were the use of smoke screens, the importance of communication and coordination, and the aggressive torpedo attacks launched by the destroyers and destroyer escorts.
The Role of Smoke Screens and Deception
One of the most innovative tactics used during the battle was the deployment of smoke screens. These screens, created by aircraft and ships, served as a vital defensive measure, obscuring the American vessels from the Japanese fleet's line of sight. The smoke not only provided cover for the escort carriers but also allowed the destroyers and destroyer escorts to maneuver more effectively. By reducing the accuracy of Japanese gunfire, the smoke screens bought valuable time for Taffy 3 to regroup and plan their next moves. Additionally, the natural haze of the morning enhanced the effectiveness of this tactic, creating an environment of confusion and uncertainty for the Japanese commanders.
The Importance of Communication and Coordination
Effective communication and coordination were the backbone of Taffy 3's defense. Despite the chaos of the battle, Admiral Sprague and his officers maintained clear lines of communication, ensuring that each ship knew its role and position. This coordination allowed the task unit to execute complex maneuvers, such as the simultaneous deployment of smoke screens and torpedo attacks. The ability to adapt quickly to changing circumstances and work as a cohesive unit was a key factor in Taffy 3's success. Furthermore, the shared sense of purpose and trust among the sailors fostered an environment where bold decisions could be made with confidence.
Aggressive Torpedo Attacks
The destroyers and destroyer escorts of Taffy 3 played a crucial role in the battle by launching aggressive torpedo attacks against the Japanese fleet. Ships like the USS *Johnston* and USS *Hoel* charged headlong into the enemy, drawing fire and creating opportunities for the escort carriers to escape. These attacks not only inflicted damage on the Japanese ships but also disrupted their formation and forced them to divert their attention. The bravery and determination of the sailors